Showing posts with label woodworking. Show all posts

Wednesday, March 7, 2012

busy, busy, busy...


well, i have completed 5 quilts in the past couple of 
weeks....quilts for chemo is on it's way.  
i love the way this one turned out.  it's a very simple pattern and striking in it's simplicity.  and in a homage to my vintage sheet collection, the backing is a vintage sheet.  the color is perfect and i love that it is lined up circles...
i used a black and white stripe for the border and it is a great addition to the modern feel.
i'm keeping this one but my friend lisa has sworn me to will it to her if something happens to me.... :)
these are the ones that i am donating to the cancer center...
now i know that some of these are similar because of the fabrics but i did change up the designs and and mixed the choice of fabrics in the different quilts.  the strip quilts are very easy to make because the top of the quilt is sewn onto the batting and backing at the same time.  
i actually started  
this one on monday morning and finished hand sewing the binding on that evening.  i would say that i worked on it for a total of about 5 hours.  super quick and easy....
this one was the first time i pieced a quilt.  when i cut the vintage sheets for the first quilt i made, i cut a lot of the fabric into squares.  this one is not very fancy but it went together rather quickly too, much to my surprise....
i did use some coordinating fabric that i had to border the quilt and the backing is a vintage sheet.
it's not perfect as you can see in the quilting stitches, but it's supposed to look a little handmade, right?
this one was a little different.  i found a pattern that looked easy so i used it to make this quilt out of flannel fabric.  i love how soft it is and the bright colors are very happy.  it's smaller than the others but still big enough to be an adequate lap quilt...
i also experimented with curved corners....really easy using a cereal bowl...
see that quilt stand in the background?  i got that at goodwill for $10.  it just needs a good coat of paint. that will happen soon, hopefully.
we have also been busy mounting our tv over our mantle.  we have gone back and forth about whether or not to put it there and the biggest hold up was the fact that we didn't want to mess around with trying to wire the cords through the wall where the chimney was.
 so i found this on pinterest that shows how you can make channels to run the cords through and not have to drop the cords into the wall.  it's brilliant and we have adapted our own design.
 it has taken a few days (okay, more than a few) because we have to keep adapting..... and we
have to wait until the new longer cable cords that we ordered get here, but hope to have that done soon.
because i am sick of the mess....
please don't judge.... :)
the channels will then be covered like this.

in a way that we will be able to pull the top slat off if we have to access or add to the cords at a later time.
the long range plan is to build built-in bookcases on either side of the fireplace.  i need to find a cheap easy way to do that too...i'm keeping my eyes open on pinterest for that because i know that i will find something i need.  i love that place....
i will be sharing more of this project soon....

Thursday, January 12, 2012

a curvy beauty.....

i can't believe that this is my first post for 2012....someone has not been sorting out her priorities....
ahem,.....
i have had my hand in about 5 different projects at once.
i rock at the multi-tasking....
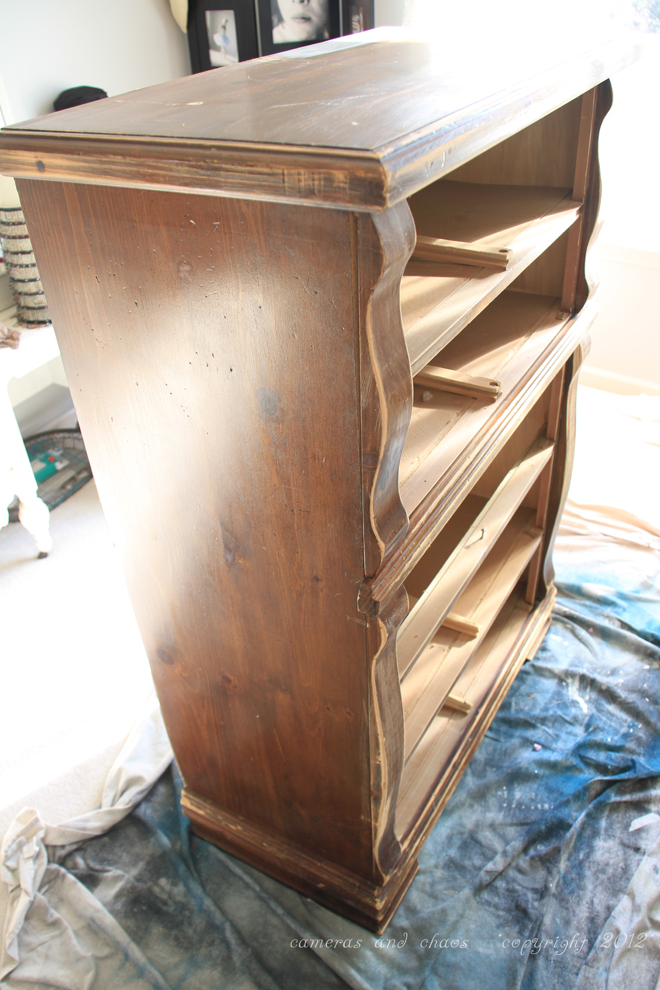
i have been redoing this dresser 
and want to use it to store my stash of vintage sheets and 
finished quilts. 


i picked this out of someone's trash last spring.  it was in pretty bad shape and all of the drawers were destroyed.  but the frame is in good shape.  the shelves (drawer bottom bases) in there are just made of cardboard so i plan on replacing them with mdf.  the inside is going to be painted creamy white and the outside with annie sloan paris grey.  i have removed the back of the piece and will replace that with beadboard.  it is in progress as we speak....
this lovely table.... 
a cute little duncan phyfe
is getting a makeover.
it  has cool brass caps for the feet that i thought were missing.
but one of them was still attached and two others (i have located a replacement for the fourth one online) were in a bag taped to these 
cool chairs that came with the table....4 of them....
they are very similar to three other chairs that i had found at the goodwill back in the summer
for $5.00 each...
here is the back story on the table and chairs...
last summer i redid a lot of furniture for my friend lisa.  she has since moved to minnesota
(i miss you girlfriend)
but her parents still live here.  she called me last week to tell me that her mom, penny,  had a table & chair set for me.  i thought that penny wanted me to make over the table for her but she had actually rescued the set from her brother who was going to burn it.  literally.  burn it in a fire pit.
she snatched it from him and delivered it to my house a few days ago...
for me to keep.  for free....free. 
thank you penny and walt... 
after she left i started inspecting it. 
the top is in pretty bad shape
 but it is really nice mahogany 
and all of the hardware is intact.  the sides raise and lower very easily.  
 and the legs and base are in really good and sturdy condition.
and it is hea-vy!!!
 i wondered if there was a leaf that went with it but penny said that her brother couldn't find it.  
but guess what????   
 a self-storing leaf......
(insert a long, high-pitched squeal here)
 obviously this leaf didn't get much use.  maybe no-one knew that it was there.  
 this little beauty is going to replace my current table and chairs in the kitchen.  it is a little less long and wide than my current set is and will fit better.  i think i'm going to refinish the top and paint the bottom.
the gouges and scratches on the top are pretty deep, so i'll see how that goes....
i'm really excited about it. 


the other project i am currently working on started out like this...


 and will be revealed in a few days....
stay tuned!!


Wednesday, November 2, 2011

christmas presents.....

i decided to try my hand at building something. from wood. by myself. 
so i went to home depot, got the wood and instead of having them cut it, i used the miter saw as a chop saw and did it myself.  
who knew that this pile of sticks could end up like this.
i got the plans for this cute little farmhouse doll bed from ana white's website.
she has all kinds of projects on her site ranging from furniture to toys to household decor. 
she gives you the plans for each project including the materials list and cut list for the wood. 
i don't think i would have attempted this if it were not for her excellent directions.
it was really easy and it only took me a few hours to finish it.  i just need to cut a piece of plywood for the bed platform and i think i will add a piece of wood across the center for extra stability.  
it will fit scarlett and tessa's american girl dolls and any of their other babies.
the wood for the second one is cut and i will put it together sometime this week.  
this project was very easy to do and very inexpensive.  
here is the cost breakdown:
2 1x2x8 @ $0.82 
3 1x3x8 @ $ 1.25
1 2x2x8 @ $1.37
=  $6.76 for the wood. 
i also bought two packages of screws (2 @ $5.58) for this project so i didn't have to scrounge around in don's hardware bin.  it was just easier this way.  there were a lot of them left over. 
i already had the paint and sandpaper.  
and that is for two beds.  
i thought that such a sweet country bed deserved sweet country bedding to dress it.  i have no experience in quilting but really wanted quilts for the little beds.  i decided that i would search for some kind of a patchwork printed fabric so i wouldn't have to sew all of those tiny squares myself.  i wasn't too hopeful that i would find something though, that wasn't too cutesy.  
imagine my surprise when i found this fabric 
at joann's.  i didn't know that they even carried anything like this.  
it's perfect.  and already quilted for me....i found this fabric for the back of the quilt. 
i love the mini-graphic print and it will be so cute when it is done.  
i already have the batting for the center and i plan on binding the quilt with fabric in the same color as the roses. i love how easy that this is going to be to put it together since most of the work is done for me.

 i think that the girls will love these beds, but in the meantime
i plan on using one of them for a couple of newborn shoots....
it think it would be perfect for that and i plan to make an extra one for me eventually. 
be sure to check out ana's site if you want to experiment in easy, basic woodworking. 
 i'm glad i did. 

Related Posts with Thumbnails